 Mystery
of HMS Tweed – Submarine ramming
Mystery
of HMS Tweed – Submarine ramming
Few records seem to remain of HMS Tweed (K250), a River class frigate and the seventh Royal Navy vessel to bear the name. When the WWII warship is mentioned in histories of the Battle of the Atlantic it's generally to mention her demise – torpedoed by the U305 with the loss of over half the ship's company. However, there are suggestions that HMS Tweed may have put up more of fight than she has been credited with – and created a bit of naval history in the process.
A feature on HMS Tweed (K250), the ship sponsored by Hatfield, was part of the original content of this site – please click here for the feature HMS Tweed (K250).
Unfortunately, the ship's main historical document – her logbook – is not registered in the National Archives at Kew. There is also no reference to it in the Board of Inquiry Report (which is at Kew). As the force of the explosion broke her in two and she sank in two minutes it was most probably lost in the sinking.
Even so the apparent level and detail of documentation is less than was hoped. There could be a number of reasons for this sparseness – companies and organisations involved have ceased to exist or disposed of their records to make space. And, of course, there was a war on so people had far more pressing issues than keeping detailed records for the benefit of future amateur historians (while some records would have been destroyed in bombing raids).
The Attack
Published on the Canadian Virtual Museum web site (www.virtualmuseum.ca) is an intriguing account of a dramatic encounter between HMS Tweed and a submarine.
According to the account, in late 1943, in the North Atlantic between Iceland and Greenland, HMS Tweed came into contact with a German u-boat on the surface which they tracked by radar. Even though it was dark they homed in and were able to make visual contact. The order "Prepare to ram!" was issued over the Tannoy (their internal communications system). The submarine spotting them blew their main vents and prepared to dive. But it was too late. HMS Tweed struck the submarine and opened fire with their 4-inch guns. The submarine appeared to roll over and dive. HMS Tweed then launched a depth charge attack. The submarine was briefly lifted out of the water by the force of the explosions before disappearing from sight. HMS Tweed continued to press home her attack with a further depth charge pattern.
A message was sent to the Commander in Chief, Western Approaches: "Have rammed and gunned and depth charged submarine". However, HMS Tweed had sustained significant damage in the ramming and was taking on water, and they were forced to return to port for repairs.
The account concludes with the information that the ship was out of action for 3 weeks. Also, an order was issued ordering escort vessels against attempting ramming attacks, which possibly means that HMS Tweed was the last vessel to carry out the order Prepare to ram (at least with the backing of the Admiralty) in the Battle of the Atlantic.
The Mystery
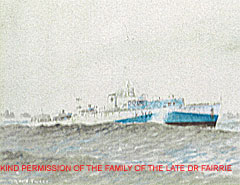
The officer who gave this personal account is not identified by name. It simply states that he was a Surgeon Lieutenant. However, all the indications are that it was the late Surgeon Lieutenant Dr Tony Fairrie.
Enquiries made to his family revealed that he had never discussed the matter with them. This in itself is not surprising; men of the wartime generation lived in a different time with different values and expectations. Men were not allowed to show any weakness, and for many it was an instinctive decision to shelter their wife and children from the horrors of war (probably doubly so for a medical man whose life was dedicated to preserving lives).
Getting confirmation of the account has proved to be more difficult than expected. However, the Royal Naval Museum was able to provide a partial corroboration with details of HMS Tweed's movements during the period in question.
HMS Tweed's movements 11 September – 11 December 1943
11 September 1943 – Arrives at Londonderry (from Plymouth).
20 September – Leaves Londonderry (no destination recorded).
29 September – Returns to Londonderry and remains there for
3 weeks.
[There is no record on why the ship was in dock
for so long, as the average turnaround was a week or less – although
slightly earlier, it matches
the period the ship was out of action given in the account]
20 October 1943 – Leaves Londonderry for the Clyde.
23 October – Leaves Clyde back to Londonderry and then on to St John's,
Newfoundland.
1 November 1943 – Arrives at St John's, Newfoundland.
10 November – Leaves St John's, Newfoundland.
25 November – Arrives at Plymouth.
28 November – Leaves Plymouth.
11 December 1943 – Arrives at Londonderry (presumably after a patrol or convoy escort).
While HMS Tweed is said to have been credited with a 'Probably damaged', the most puzzling aspect of this account is the apparent lack of official recognition and publicity. This was a stirring tale in the best 'Full steam ahead and damn the torpedoes' vein (please see box). Yet there appears to have been no press publicity (television was in its infancy). It was the stuff of legends and comic books. Yet none of the books of the Atlantic War examined mention this incident, and the account itself states there were "no medals".
All of which begs the question why?
Full speed ahead, and damn the torpedoes
This famous naval order has entered popular English usage as meaning to press on to achieve one's objective regardless of the cost.
It could be described as a nautical take on the SAS motto 'Who Dares Wins'.
The order was first issued on 5 August 1864 by Admiral David Glasgow Farragut at the Battle of Mobile Bay, Alabama, during the American Civil War.
Admiral Farragut was the US Navy's first Rear Admiral, Vice Admiral and Admiral.
He was on board the Hartford, a Union warship, when he sailed his fleet into the Confederate port of Mobile. The famous order came after the lead ship, Tecumseh, was blown up.
Admiral Farragut's actual words reportedly were: "Damn the torpedoes! Four bells! Captain Crayton, go ahead! Joucett, full speed!" (The names of crew and other commands being dropped over the years).
His order was a success. All his remaining ships made a safe passage through (they were also under fire from shore batteries).
Although both submarines and self-propelled torpedoes were in existence at the time, the torpedoes referred to were actually tethered mines (called stationary torpedoes). The torpedo as we know it only seems to have become formalised around WWI.
It's not clear from the account how HMS Tweed came to be in the vicinity of the submarine. It may have been a routine patrol or convoy escort. Or they may been ordered to the area as the authorities knew a submarine was there – possibly due to an earlier sighting or attack. Or thanks to a more dramatic reason like an Intelligence report – the result of spying, radio-interception (triangulation) or code-breaking.
The identity and fate of the submarine that HMS Tweed attacked is also a mystery. While it is not definite that the submarine was destroyed it seems unlikely it escaped after being rammed, gunned and depth charged (although it is possible). The location of the encounter meant it was a long way from a friendly harbour.
An unpleasant possibility is that HMS Tweed mistakenly attacked an Allied submarine. Submarine recognition could be difficult at the best times (one captured German u-boat, U570, returned to the battle under Royal Navy colours as HMS Graph, N46). However, no evidence has been found to confirm or support such a theory.
More than 70-years on since HMS Tweed was lost questions about her wartime service remain unanswered. However, the battle to find out the truth will go on.
11 March 2011: at least part of the mystery has been solved. Please use the link below to find out more.
Thank you to Heather Johnson of the Royal Naval Museum and the family of the late Surgeon Lieutenant Dr Tony Fairrie for their assistance.
Back to: Features on Hatfield7 November 2009
Additional link added: 11 March 2011